1. NOTE WELL: OLIMEX PIC-MCP-USB PROGRAMMERS REQUIRE FULL POWER (500MA) USB PORTS TO FUNCTION PROPERLY.
a. GENERALLY, NOTEBOOK COMPUTERS DO NOT PROVIDE FULL POWER TO THE USB PORTS. THE PROGRAMMER WILL APPEAR TO BE PROPERLY POWERED UP BECAUSE THE GREEN LED IS GLOWING BUT THE PROGRAMMER IS NOT RECEIVING ENOUGH POWER FOR THE MICROPROCESSOR TO FUNCTION.
b. GENERALLY, DESKTOP COMPUTERS DO PROVIDE FULL POWER TO THE USB PORTS BUT IT IS NOT GUARANTEED.
2. These instructions apply ONLY to the Olimex PIC-MCP-USB programmer when installed in the programming cradle that was consigned to Comptech by White Oak Audio Design. References to physical aspects are with respect to this programming cradle.
3. Open MPLAB 7.00 (note: I am using MPLAB 7.40 but the instructions are very similar for 7.00)
4. Plug USB cable from the Olimex PIC-MCP-USB into the computer or USB hub (in the case of a notebook computer) port that you are using to program ACMs with.
5. The computer should recognize the USB device that was just installed. If it does not recognize it right away, unplug and re-connect the USB cable to get it to recognize the USB device. I notice that the driver (FTDI driver used by Olimex) does not reliably detect the Olimex programmer every time.
6. The GREEN LED on the programmer should be on and the RED LED should be off.
7. Plug the 12V wall wart 12V DC adapter into the AC source and plug the 2.5mm barrel connector into the mating jack on the programming cradle. Do not plug a target ACM into the white nylon 20 pin connector yet.
8.  Select
the device to program, this is an
important step. On the MPLAB
menu bar, select the Configure>Select Device
choice. When the dialog box opens up,
select PIC16F737 from the pull-down combo box on the upper left. Click OK.
Select
the device to program, this is an
important step. On the MPLAB
menu bar, select the Configure>Select Device
choice. When the dialog box opens up,
select PIC16F737 from the pull-down combo box on the upper left. Click OK. 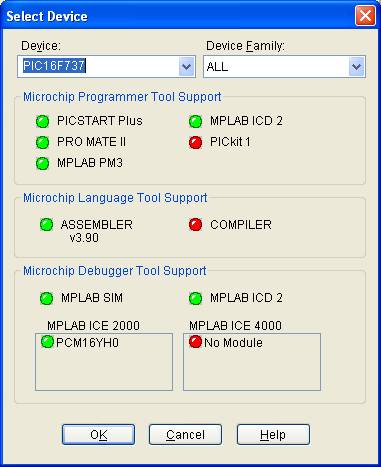
9. Enable the programmer. On the MPLAB menu bar, select the Programmer>Select Programmer >PICSTART Plus choice. Then on the MPLAB menu bar, select the Programmer>Enable Programmer option.
10.  If
the programmer does not enable, this means that the COM port selection does not
match the port that the programmer is plugged into. It will give you a message like this.
If
the programmer does not enable, this means that the COM port selection does not
match the port that the programmer is plugged into. It will give you a message like this. 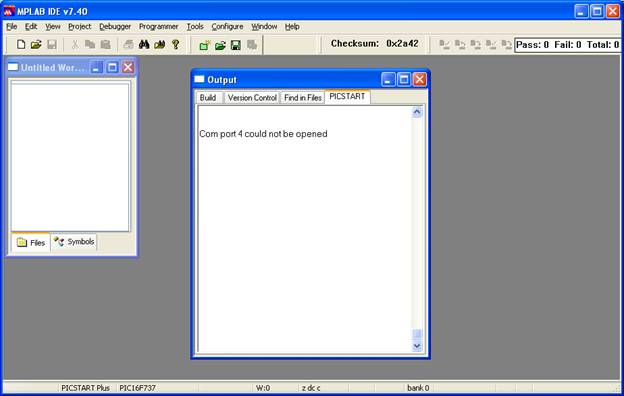
11. To
change the selection, on the MPLAB menu bar, select Programmer>Settings
and select the communications tab. Try
the other radio buttons until you get one that matches. 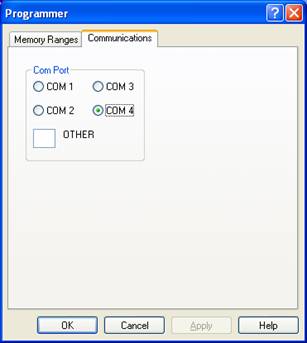
12.
 Once
you get a match, the programming Icons will illuminate on the MPLAB screen as
encircled in RED below (they are grayed out when the programmer is not
enabled).
Once
you get a match, the programming Icons will illuminate on the MPLAB screen as
encircled in RED below (they are grayed out when the programmer is not
enabled). 
13.
 You
can check the version of the microcode loaded into the Olimex programmer. On the MPLAB menu bar, select
Programmer>About and it will report the version that is currently loaded.
You
can check the version of the microcode loaded into the Olimex programmer. On the MPLAB menu bar, select
Programmer>About and it will report the version that is currently loaded. 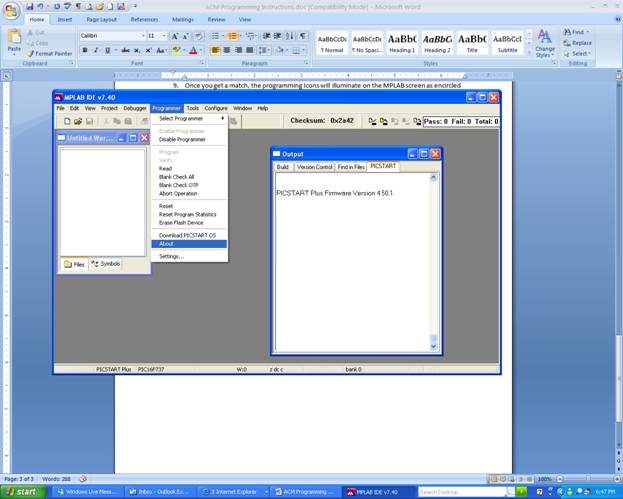
14. If
you make it this far, the programmer is up and running. Next you are ready to load the HEX file that
you wish to program into the ACM. To do
that, on the MPLAB menu bar, select File, Import 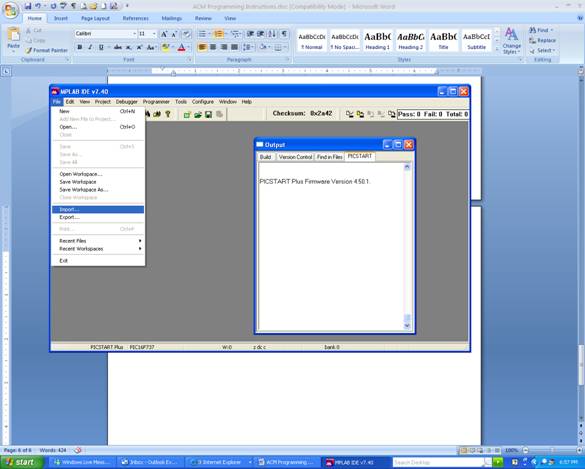 and browse to the file that you wish to
program. The one I am encircling is the
test file that we
and browse to the file that you wish to
program. The one I am encircling is the
test file that we  use
to test the ACMs, you file will have a different name
use
to test the ACMs, you file will have a different name 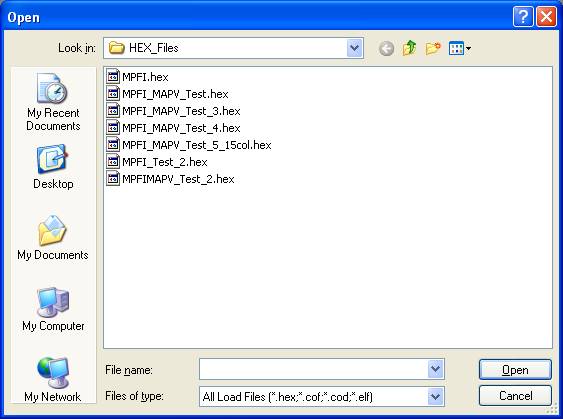
15.
 Once
you load a HEX file, all the other programming Icons will illuminate as shown
below.
Once
you load a HEX file, all the other programming Icons will illuminate as shown
below. 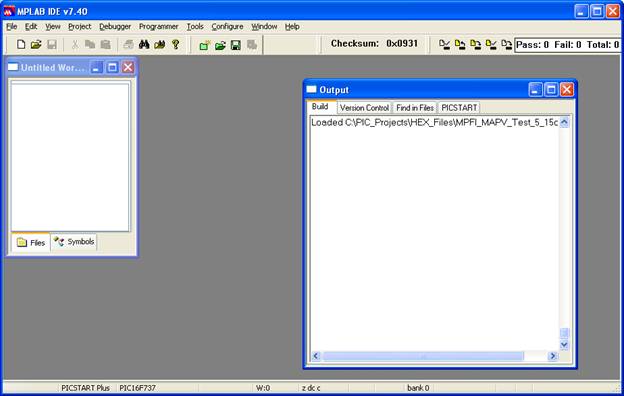
16.

 At this
point, you are ready to program a target ACM.
Plug the 20 pin white nylon connector on the ACM into the mating
connector on the programming cradle. On
the MPLAB menu bar, click the ERASE ICON then click the BLANK CHECK ICON as
noted below, the output window will indicate success if you get the “Device is
blank” message The RED LED on the
programmer will flash briefly when the erase cycle occurs.
At this
point, you are ready to program a target ACM.
Plug the 20 pin white nylon connector on the ACM into the mating
connector on the programming cradle. On
the MPLAB menu bar, click the ERASE ICON then click the BLANK CHECK ICON as
noted below, the output window will indicate success if you get the “Device is
blank” message The RED LED on the
programmer will flash briefly when the erase cycle occurs. 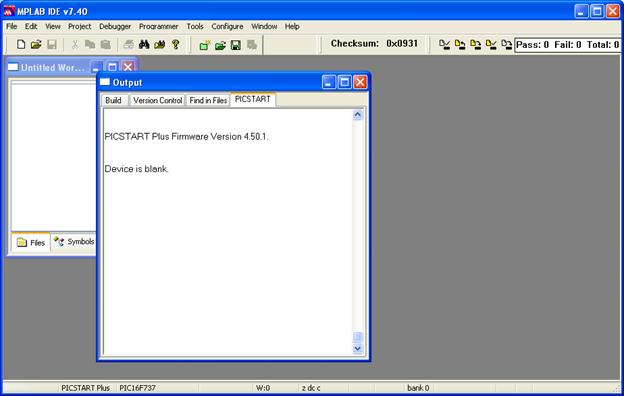
17. 
 Program
the target ACM now. On the MPLAB menu
bar, click the PROGRAM ICON as noted below, the output window will indicate
success if you get the “Programming/Verification completed successfully ”
message (your address range will be different than mine because this is just a
test file that I loaded) The RED LED on
the programmer will illuminate during the programming and verification cycles
Program
the target ACM now. On the MPLAB menu
bar, click the PROGRAM ICON as noted below, the output window will indicate
success if you get the “Programming/Verification completed successfully ”
message (your address range will be different than mine because this is just a
test file that I loaded) The RED LED on
the programmer will illuminate during the programming and verification cycles 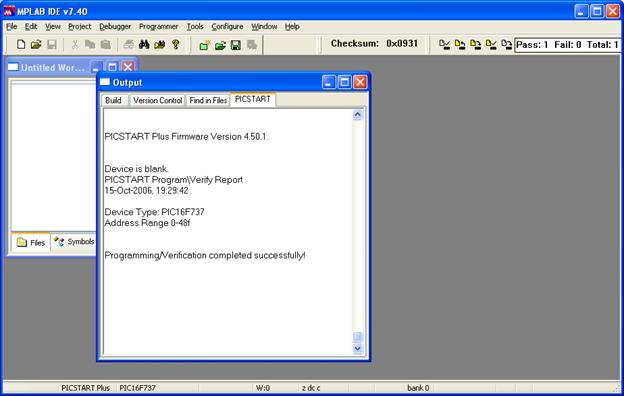
18. You have successfully programmed the ACM with the HEX file. Carefully unplug the ACM connector from the programming cradle and move it on to perform any remaining Comptech processing steps. Plug in the next ACM to be programmed with the same code and repeat the process starting at step 15. If the next ACM to be programmed is going to have different code, repeat the process starting at step 13.
19. Good luck with your programming.